Cut out trees, snowmen,angels, people, bells...whatever shapes you like using this preschool cutting activity.

Concertina Shapes
You will need
Paper
Scissors
Pencil
Stencils
Cereal box card or similar card
Sticky putty
Before you begin
1. Ensure that you have adequate paper for each child, plus some extra paper as they are abound to make mistakes or want to make more than one set of shapes in this preschool cutting activity.
2. Place the stencil patterns on card and trace around the edges to make a stencil. Each child or group of 4 children should have one stencil.
3. You may need to pre-fold the paper for younger children.
 |
 |
| Concertina fold |
Trace the card stencil |
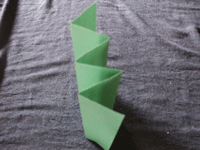
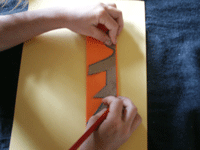
Activity
1. Using an A4 sheet of paper, concertina fold the paper as shown above. Ensure that the panels are wide enough to fit the stencil and that all the folds are equal in width. This is very important.
2. Place the stencil on the fold of the paper with the straight edge of the pattern along the folded edges of the paper.
3. Trace around the stencil. Use sticky putty to hold the stencil in place while tracing, if necessary.
4. Holding the paper securely, cut along the traced lines.
5. Unfold the row of concertina shapes and decorate or colour them if desired.
 |
 |
| Completed concertina people |
Assortment of shapes |
Variations
Use coloured paper or card, newspaper or pretty wrapping paper.
Use black card, paper or brown paper and draw faces with white pencil or crayon, or glitter pens.
If you don't find what you need right here, then use this search box:
Preschool Cutting Activity l
Winter Preschool Activities l Home l
Preschool Curriculum l
Readiness Activities l
Songs & Rhymes l
Ideas by Subject l
Free Ezine l
Preschool Science Activities l
Free Menu Planner l
Homeschool Help l
Free Kids Games l
What's New? l
Free Gifts l
Printable Worksheets l
ABC Fun & 1-2-3 l
About Shirley l
Contact Shirley l
Free Preschool Activities l
Art Appreciation l
Father's Day l
Preschool Themes l
Free E-courses l
Preschool Activities Blog

|