
| |||
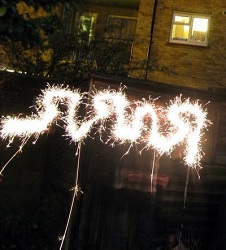
Light PaintingAn adult and child photography activity using light painting to create amazing photos. Painting with Light - Photographyby Ewan Cambell MacDougall Give a child a torch or flash light or anything that lights up and it won't be long until they are trying to move it around fast enough that it tricks the eye into seeing patterns of light. There is a form of photography called light painting that captures this. Although the operation of the camera needs to be left to adults, the actual painting can be great fun for kids. The art work is finished in seconds so it's great for short attention spans and can help develop an early understanding of how cameras work.
You will need 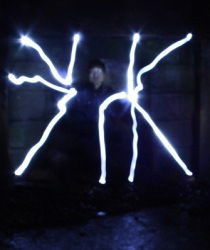
1. A camera - You need to be able to control the shutter speed on your camera. DSLR cameras are great for that, but a lot of digital compact cameras also allow you to control this. 2. A tripod - if you have one that would be great, but really any flat surface that you can leave the camera on will work just as well 3. Light sources - Torches (flashlights) will work well, but anything that lights up brightly should work too, perhaps try glow sticks or light up toys. If you plan to do this light painting activity with a lot of children at once and have the facilities attaching the camera to a computer screen or even projector works really well, so the children can instantly see the results of their work big. It can be hard for younger children to appreciate the results on the small screen on the back of the camera. Preparation You need to prepare the camera and area where you will take the pictures beforehand. This is the complicated bit of the process. All cameras will work slightly differently, so here are some general instructions, you'll need to consult your camera's manual for instructions specific to your camera. The most important thing to control for taking these images is the Shutter speed. This is the amount of time the lens lets in light. To change the shutter speed your camera will need to be set either in Manual mode, often represented with an M. Alternatively you can set your camera in Shutter Speed Priority mode often represented with an S. How long your exposure time needs to be depends on how complicated your light painting design is and how long it will take. 45 seconds might be a good starting point but it really depends on you. With some cameras you can set the length of time to Bulb which means the shutter will stay open for as long as you hold the Shutter release this will give you the most flexibility, but means the person taking the picture can't also be in it. If you have set your camera to manual you will also need to adjust the ISO and Aperture if you wish the background and people in your images to be visible then a high aperture and ISO would be desirable, although be aware that if you set the ISO much above 400 your image will likely become grainy. The flash should usually be suppressed whilst taking the picture, although some interesting effects can be created using it during very long exposures, but to begin with turn it off. The camera needs to be perfectly still whilst the light painting picture is being taken, when the lens is open for a long time any camera movement will result in your photographs becoming blurred. Therefore you cannot hold the camera. You need a tripod or flat surface on which to leave the camera. It is also important that you take extra care not to move the camera as you press the shutter release. If you have a remote control for your camera, this would be an ideal time to use it. If you don't, but are struggling with camera blur, you can set your camera to self-timer so that you are not touching the camera as the photograph takes. Setting up the location  The room needs to be dark as possible, or alternatively you can take the pictures outdoors in winter months when it gets dark early. When framing the picture it's important to make sure there is as little light as possible, all light will be exaggerated in the image, as a result, any lamps or lights in the background will become very bright and large, often taking over the whole light painting picture. Choose a location that is dark as possible and position the camera so any lights that you cannot turn off are not in the frame. Make the frame as large as possible; you cannot always judge where your drawing will go, you can always crop the image later. To get an idea of what will appear in the picture you may wish to try taking a photo with the flash as a test before hand. Method
Encourage them to draw big pictures in the air with the torches pointed at the camera, encourage them to draw big shapes slowly. Perhaps suggest shapes and see if they can make them. Once they have the hang of it start the camera, and then either let them freely draw whatever pattern they like, or maybe help guide them into drawing shapes. Remember to draw the shapes as big and as slowly as possible if you want the details to be captured. Try to encourage children not to draw shapes in the same location, but to move as they create them so that they do not overlap. If you are able to, show the children the results of their light painting on the computer so that you do not have to move the camera. This means you can repeat the activity straight away. |
  
What science activities have you done? See the tried and tested preschool science activities submitted by visitors to this site. Get ideas or upload a photo and share YOUR scientific discovering with us all. Discover two key ingredients for college success. Research shows that these two easy-to-implement preschool activities can make your child successful and influential in later life. |
||
|
[?] Subscribe To This Site
|
|||
|
Copyright © 2005-2020, Shirleys Preschool Activities.com All Rights Reserved. | |||
 Take your children to the area you have prepared and give them the torches or glow sticks you have for them.


New! Comments
Have your say! Leave a comment in the box below.